Tuesday, May 26, 2009

Tutorial: Screenshots

Some people wondered how I took pictures of my computer screen (Example here). Here's how!

Option a) You could go to this video on YouTube and watch it or

Option b) You could just read how I do it :)

O.K., let's go with option b :)

1. First, go to the screen you wish to take a picture of.
2. If you don't already have it, download Paint (Just to clarify, NOT Paint.Net, just Paint).
3. Go back to the page you wish to print.
4. On your keyboard (Near the top) you should see a button that says 'PrtSc' which means Print Screen.
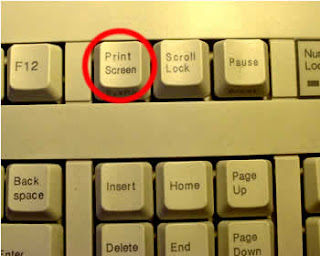
5. Press and hold (Hold for maybe 2 seconds).
6. Go back to paint and click on Edit. Select Paste:
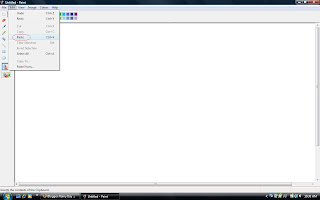
(Click on the picture to enlarge :)
7. Your image should pop up in Paint!
8. To edit (Crop, resize etc...), you must Save As and upload your image to photobucket (Or another image hosting site).
9. You're done!!!

Yay! So how did it work for everyone? Tell me if your tried it!

Monday, May 25, 2009

Freebies: Backgrounds

***Go to this post to see how to use my backgrounds!***

YAY! My first FREE backgrounds! Today, I have two for you!

Green swirls:


Hawaiian Flowers:


(Click on it to enlarge the backgrounds!)


Here is the code for Green Swirls:

http://i566.photobucket.com/albums/ss102/emijiz/swirl-wallpaper-green-1.jpg


Here is the code for Hawaiian Flowers:

http://i566.photobucket.com/albums/ss102/emijiz/3374566704_063e07a107.jpg

Tell me if you use them! Also, tell me if they work :) I tried them on my test blog and they worked, but you tell me if they work for you! Also, if you want matching headers or something in the middle, just leave a comment or email me at emijiz@gmail.com! So what do you think of my first backgrounds? Should I make more?


How to use my backgrounds - EDITED!!!

I'll be posting free backgrounds VERY soon, so here's how to use them!

1. Log into your blogger account.
2. Go to your blog Layout and then to your Edit HTML.
3. Scroll down until you see this code:

body {
background:$bgcolor;

4. (Sorry this is bold :) Copy the code in bold above.
5. Replace the code with this:

background:url();

Inside the parentheses, insert the image URL I will give you when I post the free backgrounds! Enjoy!!!


Sunday, May 24, 2009

Tutorial: Changing Fonts

Have you ever wondered how to change fonts on your blog? Well here you go!


  1. Sign in to Blogger. This will take you to your Dashboard.
  2. Under the blog you wish to change the font for, click on Layout.
  3. You are now in the 'Add and Arrange Page Elements' screen. Click 'Add a Gadget'.
  4. You are now in the 'Add a Gadget' screen. Scroll down to where it says 'HTML/JavaScript'. Next to that, click on the (+) sign.
  5. You are now in the 'Configure HTML/JavaScript' Screen. Under Content you'll see a large box, paste the entire following HTML code from the font you'd like to use in that space.
  6. Click 'Save'.

Here are the fonts you can use:

Papyrus:


Lucinda Handwriting:


Comic Sans:


Harrington:


There you have it!

***P.S. All of these fonts are courtesy of The Cutest Blog On The Block: Blog Secrets.


Thursday, May 7, 2009

Tutorial: Making a Blog Button - EDITED!

****Updated****


Earwen left a comment and asked how to make a blog button. Well I'm here to help!

1. Create your image and upload it to photobucket.
3. Resize your image to about 200x200 pixels.
4. Once you are back to your album (Done editing), hover over your image and check the box marked with the title of the image.


5. Once you check the box, scroll all the way down to the bottom of the page.
6. Click on 'Generate HTML and IMG code'.


7. It will then take you to a page that looks like this:

8. Copy all of the first code (HTML clickable thumbnails for Ebay, Livejournal, MySpace, etc.).
9. Log into your blogger dashboard and go to layout.
10. Paste the code from photobucket into an HTML/JavaScript gadget.
11. Now you need to change the code. Your code will say something like: h r e f = http / / : 'the photobucket username' Right there you erase it and put in your blog address. (right after the address it will have a line / and a question mark ?. Like I would put in http://rainydayblogdesign.blogspot.com instead of the photobucket username.
12. Now you have your blog button image!
13. Next, you have to make a NEW gadget (HTML/JavaScript)
14. Paste this:
That is your text box!
15. Put that code under your blog button image.
16. Voila! You have your blog button!

How to upload an image to Photobucket:

1. First you need to have an account with Photobucket, if you don't this whole process is worthless! I'm sure you could do it with another photo uploading site, but I've only tried Photobucket.
2. Go to your page (Where all your images are displayed) and click on this:

(Click on the picture to make it bigger)

3. It should allow you to choose your picture and upload it. If not, e-mail and I'll try to give you more step-by-step instructions!

Any questions or comments? Did it not work? Contact me and I'll try to figure out the problem!

Blessings,


Wednesday, May 6, 2009

Freebies: Scripture Tags


Enjoy!


Tutorial: Scrolling Text

Hi everyone! Here is my tutorial for how to do scrolling text (Look above my posts). I got this from Freckled Designs.

Ready? O.K., here we go!

1. Log in to your blogger account and go to your layout.
2. Select 'Add a Gadget'.
3. Select the HTML/JavaScript gadget.
4. Enter this code:


5. Where it says 'YOUR TEXT HERE' type in the desired text.
6. Done!

Example:

Yay! You're done! What do you think of your new scrolling text?


Enjoy!

Welcome!

Hi! Welcome to Rainy Day Blog Design! Here I'll post tips, freebies, fun stuff, and MORE! Be sure to visit my personal blog, A Roller Coaster Ride.

Blessings!